FREE SHIPPING OVER $50

Sitting Shuts Off Your Glutes and Core—The Reverse Plank Turns Them Back On, and Here’s the Exact Technique

If you spend six to eight hours a day parked at an office desk, your body is quietly adapting to a folded, seated position that effectively turns off your glutes, shortens your hip flexors, and forces your lower back to overwork. Known scientifically as reciprocal inhibition—and casually as glute amnesia—this daily seated posture causes your brain to lose its connection with your posterior chain, leading to slouched shoulders, chronic lumbar tightness, and a weak core. While traditional abdominal exercises like crunches only fold your front body further forward, the reverse plank works as a powerful movement reset that opens tight hips, fires dormant glute fibers, and strengthens your back extensors in one isometric hold.
Why Prolonged Sitting Turns Off Your Glutes and Core
To understand why the reverse plank is so effective for desk workers, you have to look at what happens to your muscles when you sit for extended periods. When you remain seated in a chair, your hip joints stay locked in a flexed 90-degree position.
This constant flexion shortens your hip flexors (iliopsoas) and keeps them in a tight, contracted state throughout the day.
According to the biological principle of reciprocal inhibition, when one muscle group stays tight and overactive, your brain automatically sends inhibitory signals to relax the opposing muscle group.
Because your hip flexors are continuously tight, your gluteus maximus receives fewer neural signals, causing the muscle fibers to go dormant.
Simultaneously, leaning forward toward a computer monitor relaxes your transverse abdominis and stretches out your upper back muscles, destabilizing your spine and leaving your lower back vulnerable to acute strain.
“Crunches compound desk-worker damage by pulling you forward. The reverse plank reverses sitting posture by opening your front body and firing your entire posterior chain.”
At a Glance: Standard Front Planks vs. Reverse Planks
Comparing the traditional front plank against the reverse plank shows why adding backward extension to your routine fixes desk posture faster.
| Movement Profile | Standard Front Plank | Reverse Plank |
| Primary Muscle Focus | Anterior Core (Rectus Abdominis & Quads) | Posterior Chain (Glutes, Hamstrings & Erector Spinae) |
| Hip Joint Action | Neutral Hip Alignment | Active Hip Extension (Opens Tight Hip Flexors) |
| Shoulder & Chest Mechanics | Pushes Floor Away (Can reinforce rounded shoulders) | Retracts Scapula (Opens Tight Pecs & Chest) |
| Posture Correction Value | Good for bracing; neutral for desk posture | Maximum correction for forward-head desk slouch |
| Spinal Decompression | Moderate core stability | High lumbar extension & glute recruitment |
How the Reverse Plank Reverses Desk-Worker Damage
The reverse plank serves as an immediate functional antidote to prolonged sitting by targeting the exact muscle groups that shut down during desk work:
1. Forces Maximum Glute Recruitment
Holding a reverse plank requires your glutes to contract forcefully to push your hips up toward the ceiling. This isometric hold restores neuromuscular signaling between your brain and your gluteal muscles, waking up dormant fibers and teaching them to support your pelvis again.
2. Stretches Tight Hip Flexors and Pecs
Unlike front planks, which keep your chest facing down, the reverse plank opens your entire front body. As your hips extend upward, your tight hip flexors receive an active lengthening stretch, while your chest muscles open up, reversing shoulder slouching.
3. Strengthens the Entire Posterior Chain
Holding your body in a straight diagonal line recruits your hamstrings, glutes, lower back extensors, and rear shoulders simultaneously. Strengthening these muscles builds a natural spinal corset that keeps you sitting and standing taller with far less effort.
Step-by-Step: The Exact Reverse Plank Technique
Mastering the proper form ensures you fire your glutes and protect your wrist joints without arching your lower back unsafely:
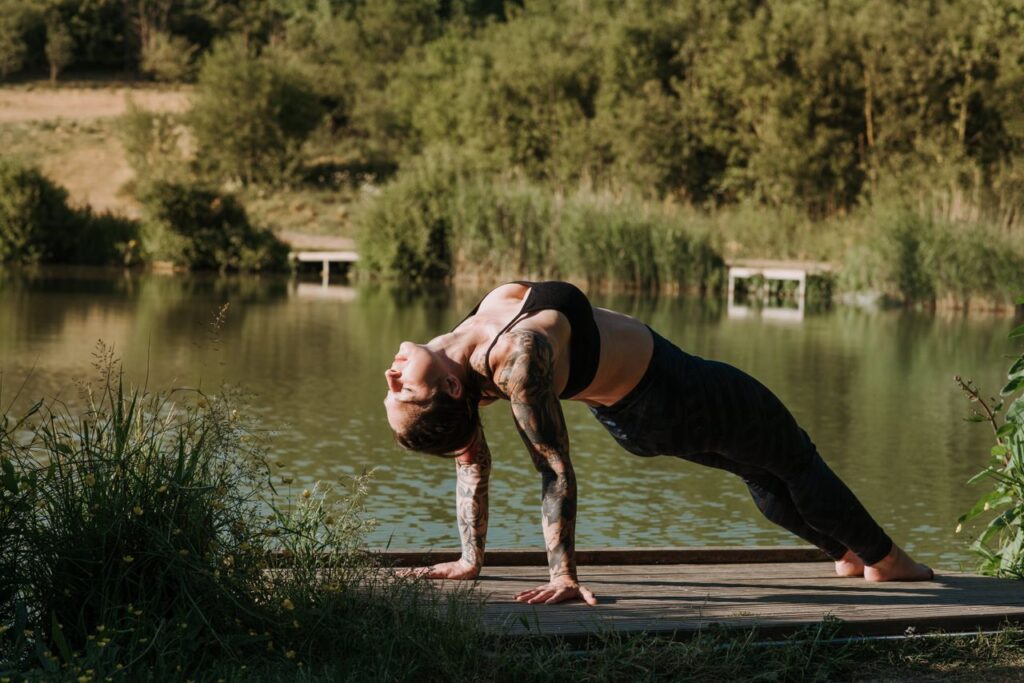
- Set Up Your Base: Sit flat on your exercise mat with your legs extended straight out in front of you and your heels resting together. Place your palms on the floor a few inches behind your hips with your fingers pointed forward toward your feet (or slightly outward if your wrists feel tight).
- Engage Your Core and Shoulders: Press firmly through your hands to push your chest out, drawing your shoulder blades together and away from your ears to engage your upper back muscles before lifting off the ground.
- Drive Hips Upward: Squeeze your glutes tightly, drive through your heels, and lift your hips toward the ceiling until your body forms a straight, rigid line from your shoulders down to your ankles.
- Lock in Alignment: Hold your hips high without letting them sag toward the mat. Keep your neck in a neutral alignment by gazing straight up at the ceiling or slightly forward rather than letting your head drop backward.
- Hold and Breathe: Maintain deep, diaphragmatic breathing while squeezing your glutes for 20 to 30 seconds. Slowly lower your hips back down to the mat with total control.
2 Beginner Modifications and Variations
If wrist discomfort or muscle weakness makes the standard reverse plank challenging at first, these accessible variations help build initial strength safely:
1. Reverse Tabletop Position (Bent-Knee Option)
Instead of keeping your legs straight out, bend your knees at 90 degrees and place your feet flat on the floor, hip-width apart. Drive through your heels to lift your torso until your thighs and torso are parallel to the floor, forming a flat “tabletop.” This shortens the lever arm, reducing stress on your shoulders and wrists while firing your glutes effectively.
2. Forearm Reverse Plank
If you experience wrist soreness, rest your forearms flat on the ground behind you with your elbows positioned directly under your shoulders. Lift your hips into the isometric plank from your forearms to relieve wrist joint pressure while keeping full focus on glute and core activation.
2 Common Form Mistakes to Avoid
Steering clear of these technical errors ensures your glutes do the heavy lifting while keeping your lower back safe:
Mistake 1: Sagging Hips Near the Floor
When your glutes tire out, your hips naturally begin to drop toward the mat, which shifts the hold’s weight onto your lower back muscles. If you cannot keep your hips elevated in a straight line, lower yourself to the mat, rest for 15 seconds, and restart with clean form.
Mistake 2: Hyperextending Your Lower Lumbar Spine
Trying to push your hips too high by arching your lower back compresses your lumbar vertebrae. Always keep your ribs tucked down slightly and focus on squeezing your glutes to drive the movement from your hips, not your spine.
Related Articles
- 90% of People Do These 7 Workouts Wrong, and They’re Destroying Their Progress—A Physical Therapist Explains How to Fix It
- This Old-School 20-Rep Squat Routine Is Still the Most Savage Leg Workout Ever
- Build Massive Legs in 30 Minutes—This Routine Hits Quads, Hamstrings, and Calves Hard
- Old-School Strongmen Used This One Exercise to Carve Abs—Still Works Like Magic
- Build Serious Muscle & Strength With Just 4 Lifts—This 3-Day Program Is All You Need